It was Mother's Day recently and instead of a pressie, I thought I'd invite Mum over to have brunch with me and just hang out. I offered her a 'menu' a few days before, with several choices, and she chose pancakes. Now I know this isn't a super fancy thing to make, and most people can probably pretty easily whip up pancakes, but this one is uber easy - and you probably have everything in your cupboard already. This recipe is another Jamie Oliver one, but I chose it because it's the simplest of simple recipes. It was a lovely sunny day, so making these in my kitchen on a Sunday morning for my mum was really nice.
1 large free-range egg (I used 2 smaller ones)
1 cup of self-raising flour
1 cup of milk
sea salt
1 tablespoon of oil
And whatever you want to put on your pancakes! I chose:
1/2 cup of frozen mixed berries
6 tablespoons of plain yoghurt
2 teaspoons of runny honey
1 teaspoon cinnamon
Crack the egg(s) into a large mixing bowl. Add in the flour, milk and a pinch of sea salt. Whisk it all together until it's a nice smooth batter. If you wanted to put anything in the pancakes, like blueberries, you would fold these in at this point. Put a large frying pan on a medium heat and add half the oil to the pan. Make sure the oil covers the whole pan - I usually use a pastry brush or a paper towel. Add large spoonfuls of the batter to the pan, with space between each pancake to allow them room to spread out. Cook them for 1-2 minutes or until bubbles appear on the surface, and then flip them over for another couple of minutes on the other side. You need to cook them in batches, so once they are cooked, I put them on a plate in the oven on a low heat so they keep warm. Use the rest of the oil between batches if you need to.
For the accompaniments, I put the frozen berries in the microwave for about 20 seconds and then blitzed them a little with a hand blender, but not so much that they were completely puréed and smooth. I divided the pancakes between two plates, in piles, and topped with the plain yoghurt, berry sauce, drizzled the honey over and sprinkled a little cinnamon on the top.
We washed our pancakes down with some mimosas (a fancy way of saying bubbly with orange juice), even though I was a little hungover. It was a really nice way to treat my mum, but with something homemade we could enjoy together.. I'm lucky that I live in the same city as my mum, so I see her fairly regularly, but that hasn't always been the case - I spent the better part of nine years living overseas and despite the fact that I've been living back home for over two years now, she still tells me how happy she is to be able to spend time with me. I am sure everyone says this about their mum, but mine is pretty special, so it was a pleasure to make these, and enjoy them with her. Love you Mum!
Friday, May 29, 2015
Sunday, May 24, 2015
Baked Lamb Meatballs with Pasta
I went to Auckland for work the other week, just for the night. My flight arrived at about 6pm the night before I had to attend the work thing, so of course I'd already researched where I wanted to get dinner from before I even got there. There was a well-recommended Japanese restaurant, Kushi, near my hotel so I ordered some takeaway - so I could eat it in my fluffy hotel robe, in my giant hotel bed of course- and sat down to wait. I was reading an old Mindfood magazine, and came across this recipe. I was so hungry and this looked so delicious, I copied it straight down onto my boarding pass (so old school - my phone was flat, ok).
A friend was coming for dinner last week, and to watch a couple of the latest Game of Thrones episodes, and the weather was pretty crappy so I thought this would be a nice warming dish.
Baked Lamb Meatballs with Pasta
800g lamb mince
6 garlic cloves, crushed
1/2 onion, peeled and finely chopped
2 tablespoons flour
1 tablespoon olive oil and extra to drizzle
800g chopped tomatoes in juice
3 tablespoons fresh oregano leaves - I used dried
1 lemon, rind finely zested
1 1/2 cups black olives - I used pitted kalamata olives, chopped up
200g feta cheese, sliced lengthways
300g dried orzo pasta
oregano leaves, fried, to garnish - I omitted these
Preheat the over to 180 degrees. Mix the lamb, garlic and onion together - using your hands is best - and season. Oil a deep baking dish with the olive oil and put the flour onto a plate. Make meatballs from the mixture and roll them in the flour, before putting them into the baking dish and toss them around in the oil a bit. Cook for 15-20 minutes until browned. Add tomatoes, oregano, lemon zest and olives to the baking dish. Top with the feta slices and drizzle with a little olive oil. Bake for 30 minutes or until feta is golden. I used reduced fat feta, so it didn't really brown - or perhaps I was just too hungry and impatient!
Once the meatballs are about 20 minutes in, cook the orzo in a large pot of salted boiling water for 11 minutes or until al dente. Drain, divide between plates and top with the baked meatballs and fried oregano leaves, if using.
This was pretty yummy, but I felt like it needed something else. Maybe some more veggies, or a bit of spice. When I make it again, I'll add in some chilli or harissa and some spinach. I meant to top it with some fresh parsley in the absence of the fried oregano too, but I forgot. Excellent on a cold night though, and pretty quick. I've never used orzo before, and it's a nice alternative to your regular sorts of pasta as it has the same texture as rice - I'd like to experiment with it a bit more. And you really can't go past something topped with slices of cheese. Next time, I'll throw caution to the wind and go full fat feta. Yummo!
Friday, May 15, 2015
Tomato and Chilli Chutney
I had quite a few green chillis on my plant in the garden recently and I was really hoping they would ripen at the same time so I could make some chilli chutney or relish. But they didn't - they ripened frustratingly slowly, one by one. Not helped by our cat pulling a couple off the plant before they were ready, bringing them inside and giving them a good chew. I did however pay a visit to my aunt in Martinborough - who supplied the olive oil used for the pesto a few weeks back - and she gave me an abundance of chillis from her garden. Back on track.
I love a good chutney, especially with cheese and crackers or in sandwiches, and this recipe was so easy. It was from BBC Good Food, which is another of my go-to websites. It was submitted by a reader, so I was a tiny bit sceptical, but it had some positive comments and seemed super easy so I thought I'd give it a go. I made a half batch, because I don't have a really big pot at the moment, so that's the quantities I've listed below. It made one and a half medium jars and one small jar, which was plenty for just two of us. Just double everything if you want more.
Tomato and Chilli Chutney
250g red onion, roughly chopped
500g tomatoes, roughly chopped
3 garlic cloves - 4 if you're doubling this recipe - roughly chopped or crushed
4-6 chillis, roughly chopped - I used 4 and it's a bit on the spicy side, so I'd recommend less if you don't like it too spicy, or removing the seeds
A thumb-sized piece of ginger, peeled and chopped
125g brown sugar
75ml red wine vinegar
5 cardamom seeds - I had ground cardamom in my pantry, so I used about 1/4 teaspoon of that instead
1/4 tablespoon of paprika - add a little more if you like the smoky flavour, like I do
Put all your ingredients into a pot and bring to a gentle simmer, stirring occasionally. If you're making a half recipe, like I did, you might need to add a splash of water as well - but not too much as the tomatoes have a lot of water in them. Simmer on a low heat for one hour, without a lid on. Use a hand blender to blend the ingredients, but just a little as you don't want to purée it - it should still be chunky. Bring it to a gentle boil again, and boil until it looks shiny, thick and sticky. This should only take a few minutes. Spoon into sterilized jars. I had no idea how to sterilize jars because this is the first time I've made anything that goes in jars, so I just boiled some water in a pot and put the jars in for a few minutes and took them out with tongs. Turns out the same website this recipe is from, has some handy instructions here if you need them though. Refrigerate in the jars overnight. The recipe says it will keep for 6 weeks.
Nice and spicy and sticky and excellent with cheese. I'll definitely make this again now I know it's good - and I'd make the full recipe as a few extra jars would make great gifts. I even made some cute labels, and gave the small jar to our upstairs neighbours.
Saturday, May 9, 2015
Review: Poquito
I stumbled across this great little cafe and bar in Wellington when I had about half an hour between the gym and a hair appointment (which sounds so 'ladies who lunch', but it was a Saturday, ok). I was really hungry and I was trying to find something really yummy, but also quick - and a chicken salad sandwich just wasn't going to cut it.
Poquito is Spanish for 'a little bit' and that's pretty much just what I was looking for. On their website they say they are Wellington's best kept secret, and I am inclined to agree. They have a small brunch menu, as well as tapas, cocktails, other alcoholic drinks and coffee. The place is pretty small (sensing the theme here?) but there was a table just by the door which I grabbed. It opens up to some more tables up the back, but it's definitely got an intimate, cosy vibe.
I ordered the Spanish baked egg, with tomato, black bean and chorizo. The woman who served me was lovely and I only waited for about 10 minutes for my food - the apology for the wait when she brought it to me was completely unnecessary. The baked eggs were perfect - it was exactly what I felt like, and just the right size - and at $12.50, frankly, a bargain. Simple, uncomplicated but delicious. They weren't stingy on the chorizo, which is always a bonus, and the sprinkling of toasted almonds on the top was surprisingly on the money and added a really nice texture. The bread was fresh and lightly toasted, but not too hard.
I think this place has got a great thing going on - nice, simple menus with a few things so they can focus on doing them really well. I feel like they would be able to make the shift from brunch during the day, to tapas and cocktails in the evening with ease, providing a nice atmosphere no matter the time of day. I just had a peek at their Twitter, and it seems they have live music there some evenings as well. I'm looking forward to sampling some vino tinto and diablos a caballo here one night very soon.
Poquito
11 Tory St
Wellington, New Zealand
Monday, May 4, 2015
Chocolate Brownie
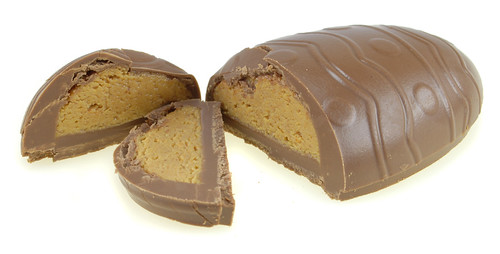
www.candyblog.net |
Drool. I love the combination of peanut butter and chocolate - so sweet, but so salty - but this egg was a little full on, like American-candy full on. So rather than giving myself one hell of a serious sugar high, I thought this would be great in brownie. Because this egg is so intense and sweet, I was looking for a slightly healthier recipe, but one that would still be fudgy. Hello www.healthyfood.co.nz!
Chocolate Brownie
1 cup unsweetened apple puree or sauce
1/3 cup cocoa powder
3/4 cup self-raising flour
1/2 teaspoon baking soda
1/2 cup sugar
1/2 teaspoon of salt
1/2 cup dark chocolate chips
3/4 cup (70g) walnuts (optional)
Now before you start getting any kind of healthy idea from this, remember I said healthier. The apple puree I used was sweetened, so I used a little less sugar, as I didn't want the brownie to be overly sweet. Aaaaand instead of using nuts, I just used the chopped up Reese's egg - which made about a cup total.
Preheat the oven to 175 degrees celsius. I used regular bake, not fan bake, as I wanted the brownie to cook slowly so it would stay fudgy and not dry out. Lightly oil a 20cm x 20cm baking dish. I used an enamel dish that was about 20 x 15, and 5 cm deep as I planned on cutting it into more bite size pieces, rather then squares.
Put the apple puree in a bowl and sift in the cocoa, flour and baking soda. Add the sugar and salt and mix until just combined - over mixing will toughen the brownie. Gently fold in the chocolate chips and nuts (or the excess amounts of chopped up Easter egg) and transfer to your baking dish. Bake for 25-30 minutes until the centre is still fudgy when you stick a skewer in it. As mine was in a deeper pan, 30 minutes was about right. Let's just say 'fudgy' one more time.
You're meant to cool the brownie in the dish for 5-10 minutes before turning it out and then slice it when it's cold, but I made these not long before we had to leave so I just cut them into small pieces in the pan, and put them into a plastic container. Dust them with icing sugar, or serve them with cream or yoghurt. I usually prefer the tartness of yoghurt with something sweet like this, but surprisingly, this wasn't as sickly sweet as I thought it would be and the chunks of the peanut butter centre from the egg were just amazingly good. Small pieces were definitely a good call though! I'm totally sold on using apple puree in brownies now - it results in a really nice (all together now) fudgyness and help it to not be overly rich in sweetness.
If I made this again, I'd probably still omit the nuts (just because I don't want nuts taking up any room chocolate could be taking up), and cut up some Whittakers chocolate, rather than using chocolate chips. I consider myself a bit of a brownie connoisseur- in the eating rather than the making - and it's hard to get that soft chewy texture, with the crunch of chocolate chunks and the crispy top, but this is a pretty good go to recipe.
Subscribe to:
Posts (Atom)